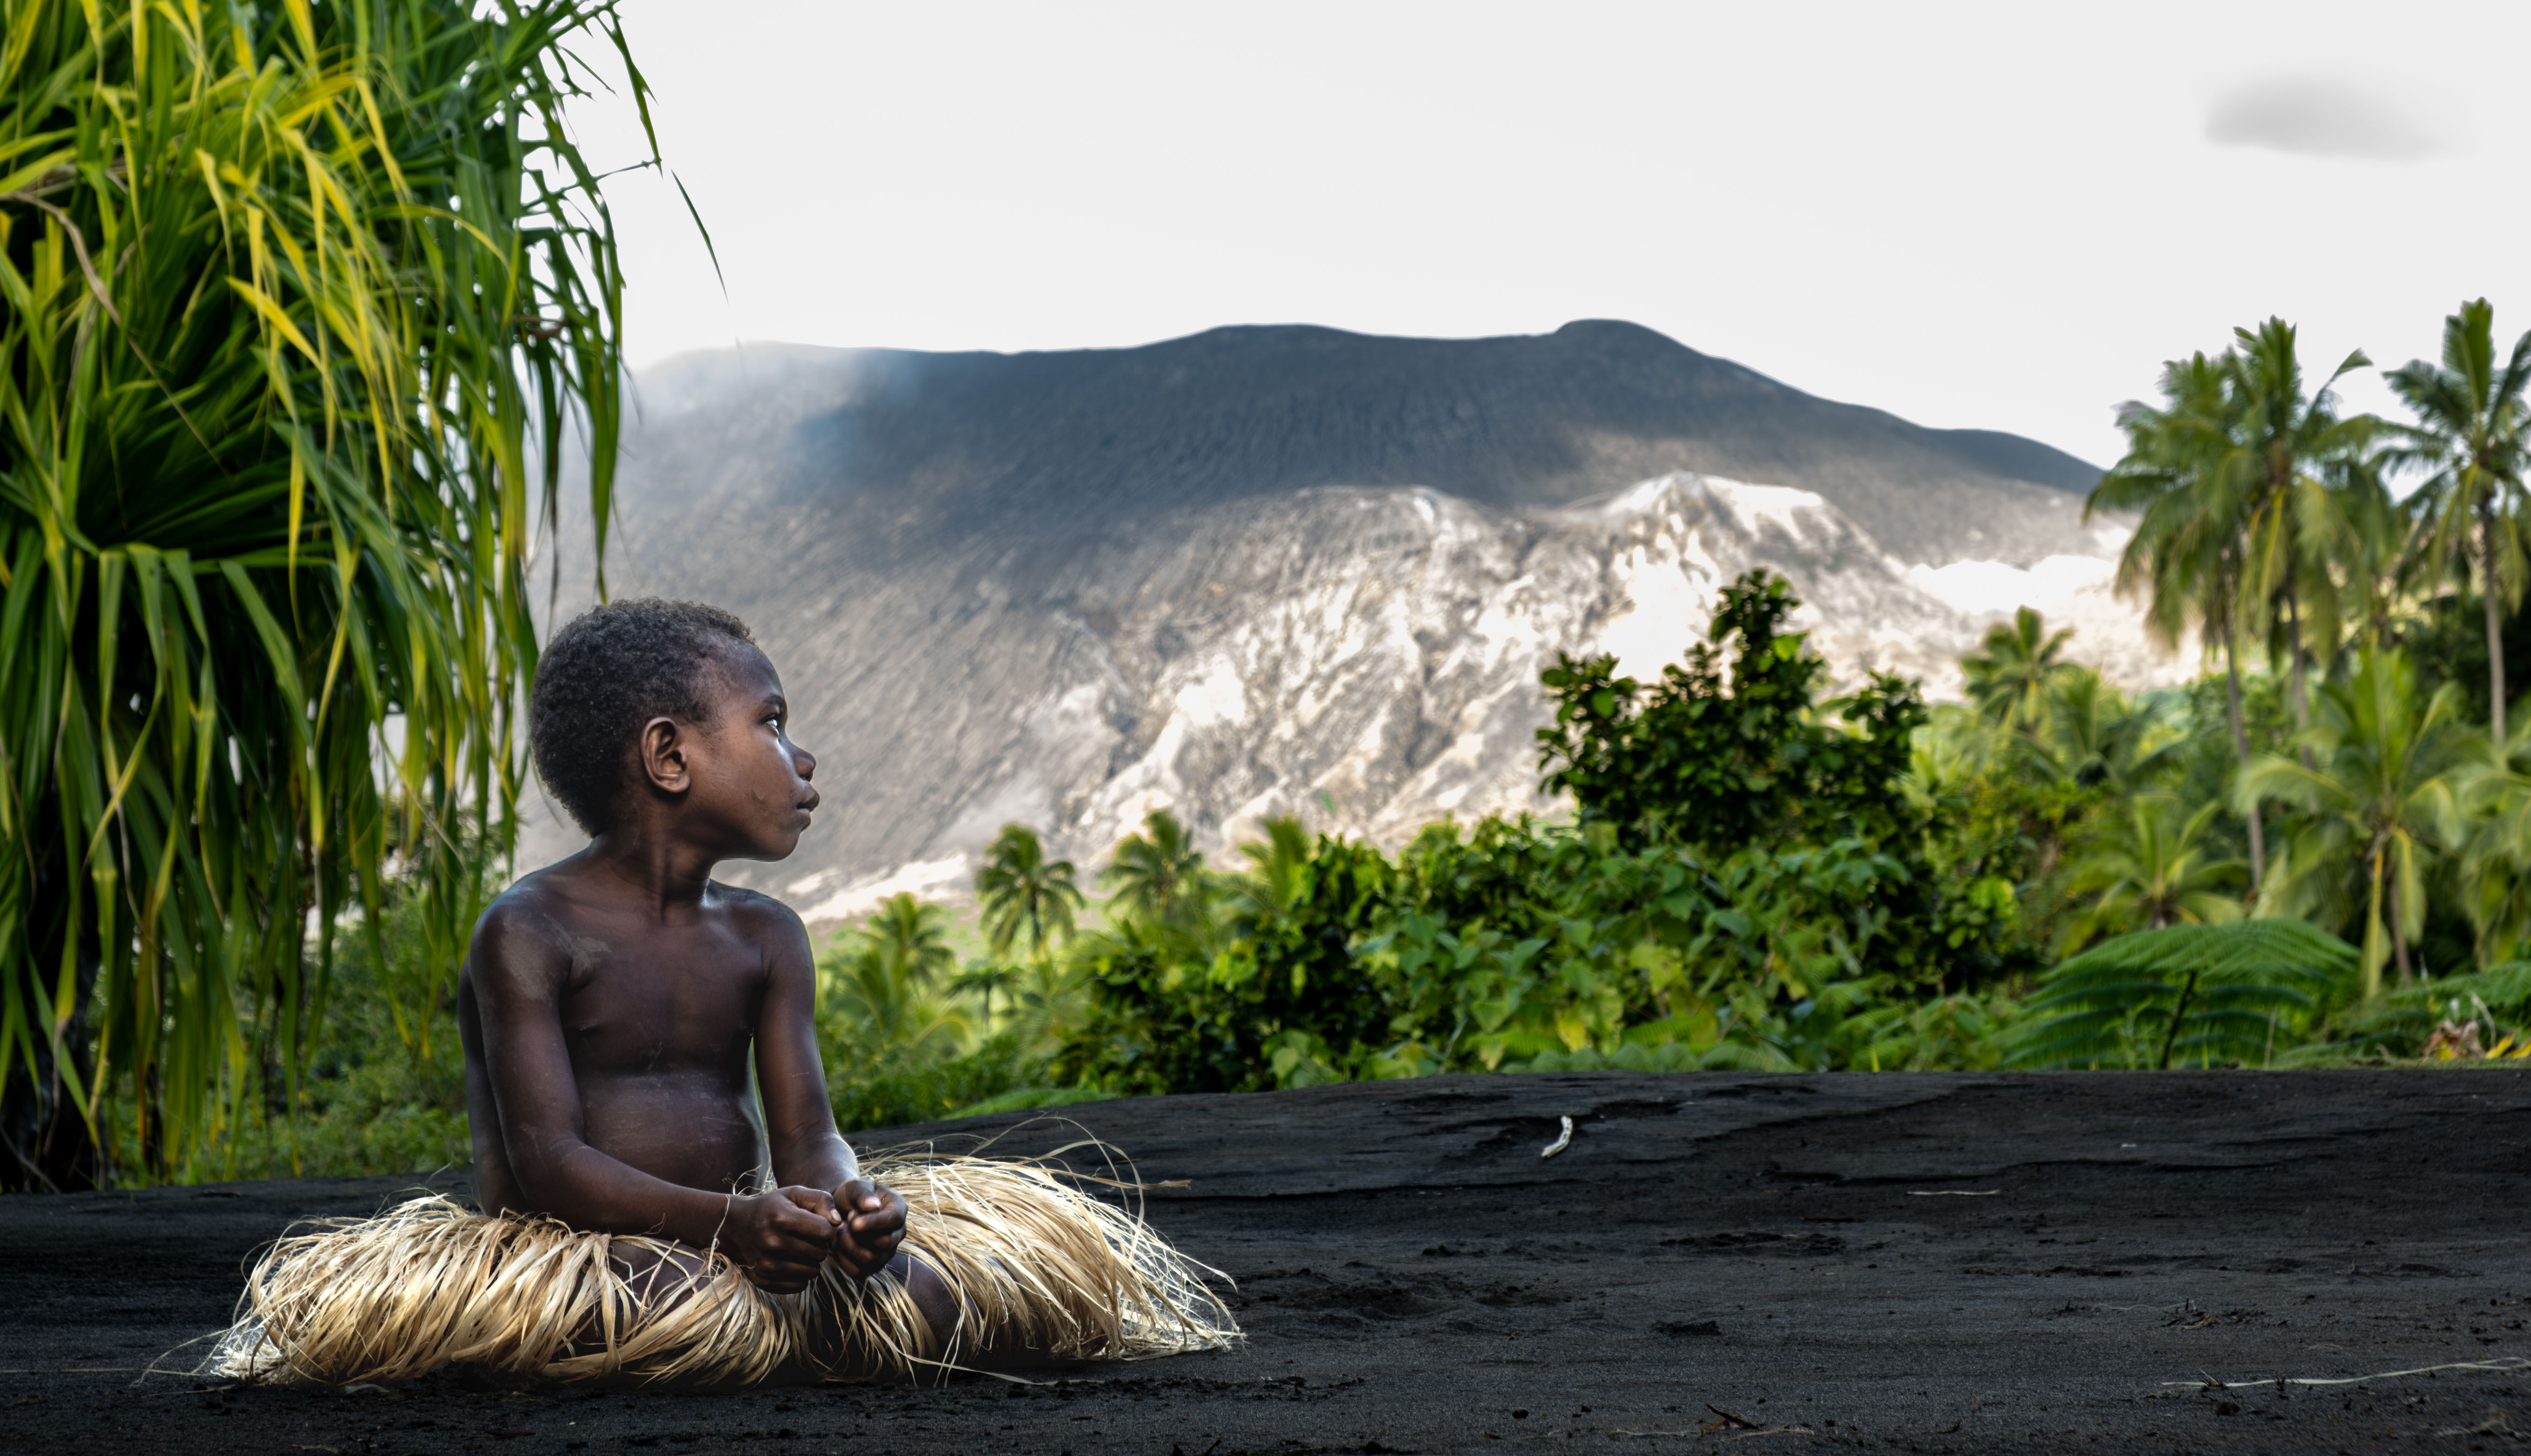
Der Feuerberg

Der 361 Meter hohe Mount Yasur liegt im Südosten der Insel Tanna und befindet sich in der Subduktionszone der indisch-australischen und der pazifischen Platte. Die Bewegungen dieser Platten führen zu häufigen Erdbeben und treiben die anhaltende vulkanische Aktivität an. Seit über 800 Jahren kommt es dort zu nahezu ununterbrochenen Eruptionen, weshalb der Vulkan als aktiver Stratovulkan gilt. Charakteristisch für Stratovulkane sind ihre zahlreichen übereinandergelagerten Schichten aus erstarrter Lava, Asche und Gestein, die durch wiederholte Eruptionen entstehen und dem Mount Yasur seine steile, kegelförmige Gestalt verleihen.
Für die Fotointeressierten unter euch zeige ich einmal, wie dieses Foto im Detail entstanden ist und welche Tricks und Einstellungen ich dabei verwendet habe.
Das Kamera-Setup
Fangen wir einmal mit dem Kamera-Setup an: Für dieses Bild habe ich meine FujiFilm X-T4 mit dem XF10-24mmF4 R OIS WR Objektiv auf einem Stativ verwendet.
Da das Foto in der Dunkelheit entstehen sollte, um das rote Glühen des Vulkans sehen zu können, empfiehlt es sich, bereits etwas früher, noch bei Tages- oder Abendlicht, das Stativ an der gewünschten Stelle zu positionieren und den Fokus manuell an der Kamera einzustellen.

Bildaufbau und Motivwahl
Bevor ich allerdings den Fokus einstellte, musste ich erst das Motiv selbst korrekt einrahmen. Wie genau das Foto aussehen und was darauf zu sehen sein soll, hängt stark von deinem Fotostil ab.
In meinem Fall sollten natürlich der Vulkan und sein rotes Glühen zu sehen sein, aber auch die grünen Büsche bzw. Gräser am unteren Rand, um etwas mehr Lebendigkeit reinzubekommen und es nicht zu langweilig aussehen zu lassen.
Blende und Schärfentiefe
Einen wichtigen Faktor durfte ich dabei nicht ausser Acht lassen, nämlich die Schärfentiefe. Diese wird mit der Blende f eingestellt und sollte je nach Fotoobjekt angepasst werden. Für Landschaftsaufnahmen wird in der Regel ein f-Wert von f8 – f16 empfohlen – dies sind aber keine festgelegten Regeln und hängen zum Teil auch von der Kamera ab, denn jede Kamera hat ihren ganz eigenen „Sweet Spot“.
Bei der Blende gilt im Allgemeinen:
- Je geringer der Wert, desto grösser die Blendenöffnung und desto kleiner ist die Schärfentiefe.
- Je höher der Wert, desto kleiner ist die Blendenöffnung und desto grösser ist die Schärfentiefe (wird vor allem bei Landschaftsaufnahmen genutzt).
Da der Vulkan im Fokus stehen sollte, habe ich zunächst die Blende auf f6.4 eingestellt und anschliessend den Fokus manuell gesetzt. Manche setzen erst den Fokus und dann die Blende, aber um ehrlich zu sein: Mach es so, wie es dir am besten passt. Bei der manuellen Fotografie muss man ohnehin etwas länger an den Rädchen und Einstellungen drehen, bis alles so passt, wie man es haben möchte.
Und dann hiess es warten, bis es dunkel wurde.
Die Kameraeinstellungen
Solltest du bereits Erfahrung im Fotografieren von Aurora Borealis bzw. Australis haben, wird dir diese Einstellung bekannt vorkommen: Um das Glühen des Vulkans, das mit blossem Auge bei Weitem nicht so feurig aussah, auf dem Foto sichtbar zu machen, braucht es eine Langzeitbelichtung. Wie hoch diese ausfällt, hängt stark von der Leuchtkraft des Motivs ab. In meinem Fall lag die Belichtungszeit bei 30 Sekunden.
Bei Langzeitbelichtungen sollte bzw. muss für ein scharfes Foto ein Stativ verwendet werden. Je höher die Langzeitbelichtung eingestellt ist, desto sensibler reagiert die Kamera auf Mikrobewegungen. Also nicht aus der Hand fotografieren, sondern die Kamera so positionieren, dass sie sich bei der Aufnahme nicht bewegt.
Da auch beim Auslösen der Kamera Mikrobewegungen auf dem Foto sichtbar werden, verwende am besten einen Fernauslöser via Kabel oder Bluetooth oder einen Selbstauslöser von einigen Sekunden – ich nutze in der Regel mindestens 5 bis 10 Sekunden.
Der ISO-Wert
Und zum Schluss brauchen wir natürlich noch den ISO-Wert. Der ist stark davon abhängig, wie dunkel bzw. hell es ist, wie hell oder dunkel das Foto sein soll und wie die Blende eingestellt ist. Denn sowohl mit der Blende als auch mit dem ISO-Wert kann man den Lichteinfall in die Kamera steuern. Dementsprechend haben auch beide Einstellungen Auswirkungen auf das Licht im Foto.
Für das Foto, dass du vor dir in der Ausstellung siehst, lag der ISO-Wert bei 400.
Auch hier braucht es bei solchen Langzeitbelichtungen etwas Geduld, da sich die Lichtverhältnisse durch Wolken, den aufsteigenden Mond und in diesem Fall das Leuchten des Vulkans ständig ändern. Dementsprechend muss man auch die Lichtempfindlichkeit ständig neu anpassen.
Bitte achte vor allem bei der ISO darauf, dass du mit dem “Sweet Spot” deiner Kamera arbeitest, denn sonst riskierst du Bildrauschen, das die Schärfe deines Fotos und damit auch das Endresultat beeinträchtigen kann. Z. B. fängt meine Kamera bereits bei geringen ISO-Werten leicht mit Bildrauschen an. Andere Kameras kommen problemlos auf hohe ISO-Zahlen, ohne zu rauschen.
Zum Vergleich – es kommt immer auf das Zusammenspiel der verschiedenen Einstellungen an:


Das Grünzeug sichtbar machen
Und zu guter Letzt die Büsche und Gräser. Wie zu Beginn gesagt, um das Foto nicht langweilig aussehen zu lassen, wollte ich die Büsche im Vordergrund zum Vorschein bringen. Da es am Vulkan kein unnatürliches Licht, wie z. B. Strassenlampen, gab, war es stock dunkel und ohne Taschenlampe war so gut wie nichts zu erkennen. Übersetzt heisst das: Die Büsche verschwanden auf der Kamera in ein dunkles Loch. Um das zu ändern, half die Taschenlampe.
Jetzt kommen wir zum komplizierten Part dieses Fotos: Aufgrund der Langzeitbelichtung von 30 Sekunden, bei denen die Kamera das Licht über diesen Zeitraum einfing, durfte man die Büsche nicht zu lange anleuchten, sonst würde man auf dem Foto nur ein weisses und komplett überbelichtetes Buschwerk sehen. Um die Pflanzen also nicht zu stark zum Vorschein zu bringen, wurden sie nur wenige Sekunden angeleuchtet.
Die richtige Belichtungszeit der Büsche einzuhalten, war bei jedem Fotoversuch eine neue Herausforderung – aber das ist doch das, was bei der Langzeitbelichtungsfotografie so Spass macht, oder? 😉
Das Endergebnis
Fire Mountain
The 361-meter-high Mount Yasur is located in the southeast of the island of Tanna and lies within the subduction zone between the Indo-Australian and Pacific tectonic plates. The movement of these plates causes frequent earthquakes and drives the volcano’s persistent activity. For more than 800 years, eruptions have occurred there almost continuously, which is why the volcano is classified as an active stratovolcano. Characteristic of stratovolcanoes are their many overlapping layers of solidified lava, ash, and rock, formed through repeated eruptions and giving Mount Yasur its steep, cone-shaped appearance.
For those of you who are interested in photography, I’d like to show you exactly how this photo was created and which techniques and camera settings I used.
The Camera Setup
Let’s start with the camera setup: For this image, I used my FujiFilm X-T4 with the XF10-24mmF4 R OIS WR lens mounted on a tripod.
Since the photo was meant to be taken in darkness in order to capture the volcano’s red glow, I recommend arriving a little earlier, while there is still daylight or twilight, to position your tripod at the desired location and manually set the focus on your camera.
Composition and Subject Selection
Before setting the focus, however, I first had to frame the scene correctly. How you compose your image and what you want to include depends largely on your personal photographic style.
In my case, I naturally wanted to capture the volcano and its red glow, but I also wanted the green bushes and grasses in the foreground to be visible. This added a bit more life and depth to the image and prevented it from looking too plain.
Aperture and Depth of Field
One important factor I couldn’t ignore was depth of field. This is controlled by the aperture (f-stop) and should be adjusted according to the subject you are photographing. For landscape photography, an aperture between f/8 and f/16 is generally recommended. However, these are not fixed rules and can vary depending on the camera, as every camera has its own “sweet spot.”
As a general rule:
- The lower the f-number, the larger the aperture opening and the shallower the depth of field.
- The higher the f-number, the smaller the aperture opening and the greater the depth of field (which is why higher f-numbers are often used for landscape photography).
Since I wanted the volcano to be the main point of focus, I initially set the aperture to f/6.4 and then manually adjusted the focus. Some photographers prefer to focus first and set the aperture afterward, but honestly, do whatever works best for you. When shooting manually, you’ll be adjusting dials and settings constantly anyway until everything looks the way you want it.
After that, all that was left to do was wait for darkness to fall.
Camera Settings
If you have experience photographing the Aurora Borealis or Aurora Australis, these settings may look familiar. To capture the volcano’s glow—which appeared far less fiery to the naked eye than it does in the photograph—a long exposure was required.
The exact exposure time depends heavily on the brightness of the subject. In my case, I used an exposure time of 30 seconds.
For long exposures, a tripod is essential if you want a sharp image. The longer the exposure, the more sensitive the camera becomes to even the smallest movements. In other words, don’t shoot handheld—make sure the camera is positioned securely and remains completely still throughout the exposure.
Even pressing the shutter button can introduce tiny vibrations that become visible in the final image. Therefore, it’s best to use either a cable release, a Bluetooth remote, or the camera’s self-timer. I usually set a delay of at least 5–10 seconds.
ISO Settings
Finally, we need to consider the ISO setting. The ideal ISO depends heavily on how dark or bright the scene is, how bright you want the final image to be, and which aperture setting you have chosen.
Both aperture and ISO influence the amount of light captured by the camera, meaning that both settings directly affect the brightness of the final image.
For this volcano photograph, my ISO was set to XY.
Long-exposure photography requires patience because lighting conditions constantly change due to clouds, the rising moon, and in this case, the glow of the volcano itself. As a result, you often need to readjust the camera’s sensitivity to light.
When working with ISO, pay particular attention to your camera’s “sweet spot.” Otherwise, you risk introducing image noise, which can reduce sharpness and negatively affect the final result. For example, my camera begins to show noticeable noise even at relatively low ISO settings, whereas other cameras can handle much higher ISO values without any visible noise.
For comparison, it always comes down to how the different settings work together.
Making the Vegetation Visible
Last but not least, let’s talk about the bushes and grasses in the foreground.
As mentioned earlier, I wanted to include vegetation in the foreground to make the image more visually interesting. Since there was no artificial light near the volcano—such as streetlights—it was pitch black, and without a flashlight it was almost impossible to see anything. Translated into photographic terms: the bushes simply disappeared into a black void on the camera. To solve this problem, I used a flashlight.
This is where things became a bit more complicated. Because the image was exposed for 30 seconds, during which the camera continuously collected light, I couldn’t illuminate the bushes for too long. Otherwise, they would have appeared as a bright white, completely overexposed mass in the photograph.
To keep the vegetation visible but subtle, it was illuminated for only a few seconds during the exposure.
Getting the lighting duration just right for the bushes was a new challenge with every attempt—but isn’t that exactly what makes long-exposure photography so much fun? 😉
The Final Result